The Nvidia RTX 4090 is an incredibly powerful graphics card capable of stunning visuals and high frame rates in the latest games. One way to push the performance even further is through overclocking the video memory (VRAM). With some time and patience, you can tune the memory speed for noticeable gains in FPS and game smoothness. This guide will walk you through the basics of safely overclocking VRAM on the RTX 4090.
Overview of Memory Overclocking
The RTX 4090 comes equipped with 24GB of cutting-edge GDDR6X memory running at stock speeds of 1313Mhz (21Gbps effective speed). This provides incredible memory bandwidth of up to 1TB/s for transferring textures and other data to the GPU cores.
However, the memory chips have headroom beyond the stock speeds. By overclocking the VRAM, you can achieve higher transfer rates and more bandwidth to feed the demanding GPU. This translates to smoother gameplay, faster load times, and higher frame rates in GPU-limited scenarios.
The key is increasing the memory clock speed through small, incremental steps while monitoring for stability. If done properly, you can achieve memory overclocks of 1500Mhz or higher on air cooling for a 10-15% bump in effective speed. The process requires patience but brings rewarding performance improvements.
Warning About Overclocking Dangers
Before beginning, it’s important to caution that overclocking does carry risks. Pushing hardware beyond stock speeds can lead to system instability or hardware damage in worst-case scenarios. Always overclock at your own risk.
The RTX 4090 pulls high wattage at stock settings. Combined with an overclock, the power draw can exceed safe limits of the hardware including the VRAM chips or power delivery components. Instability or crashes are likely before any permanent damage but it’s best to take precautions.
Make sure you have excellent case airflow and a high-quality power supply over 1000W before attempting an overclock. Monitor temperatures closely and stop if you see any sign of components overheating. Reduce voltages and clocks if needed rather than chasing maximum speeds. The small performance gains are not worth damaging expensive hardware.
Proceed carefully with the steps below to find the optimal memory OC for your card. Every GPU varies so your maximum stable overclock will differ from someone else’s.
Software for Overclocking the RTX 4090 Memory
The first step is choosing software to control and monitor the overclocking process. There are a few good options:
- EVGA Precision X1 – Excellent for EVGA cards but also works with other models. Lets you control clocks, voltage, fan speeds, etc.
- MSI Afterburner – The most popular OC software compatible with all cards. Interface can be complex for beginners.
- Asus GPU Tweak II – Designed for Asus graphics cards but supports others too. User friendly for basic overclocking.
I’ll be using EVGA Precision X1 since I have an EVGA RTX 4090. The steps will be very similar on other software.
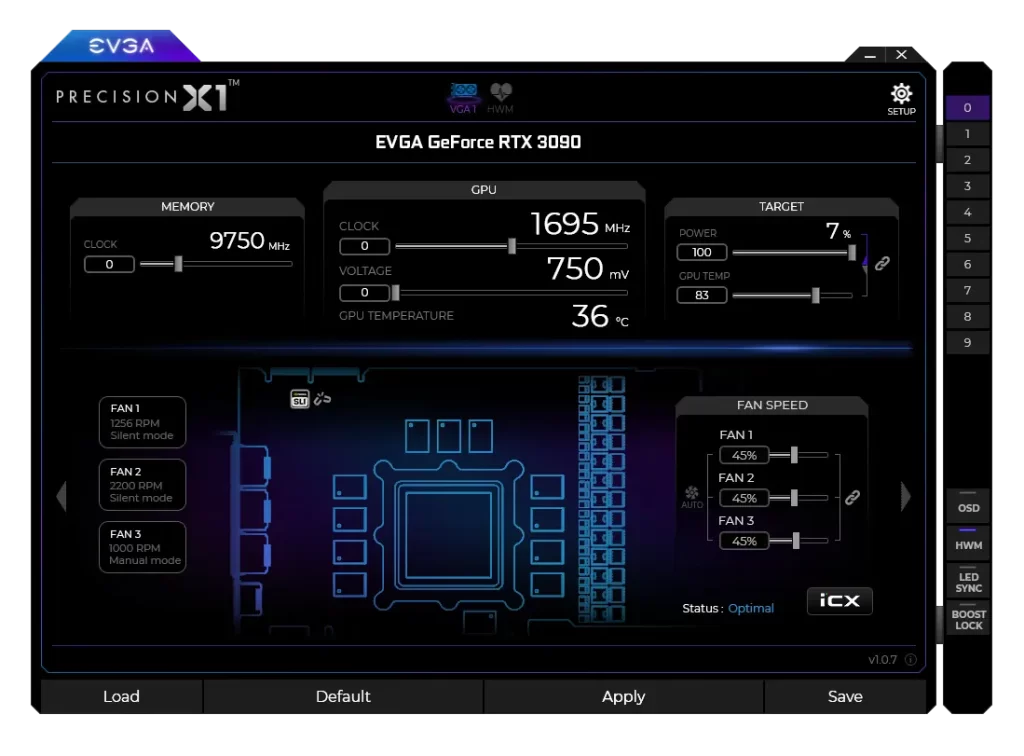
The tools above offer real-time monitoring of clock speeds, voltages, temperatures and more. This feedback is critical for stable overclocking.
Finding the Max Stable VRAM Overclock
With software installed, it’s time to start increasing the memory clock to find the maximum stable speed for your card. Here are the step-by-step instructions:
- Record baseline benchmarks – Before overclocking, run benchmarks in your desired games and record FPS scores. This will help gauge performance improvements from the OC.
- Max power and temperature limits – Set power and temp limit sliders to maximum in the OC tool. This prevents any throttling during testing.
- Start with +100mhz offset – Apply a small +100mhz core clock and +100mhz memory clock offset to start. This gets things stable before bigger jumps.
- Add +100mhz memory offset – Now simply add +100mhz to just the memory clock each time, applying the change in software and running a quick test for stability.
- Check for artifacts – As you add offset, check for visual artifacts or flickering indicating an unstable overclock. If any display anomalies appear, reduce offset by -50mhz.
- Stress test – After reaching your max stable offset, run a GPU stress test like FurMark for 10-15 minutes. If it passes without crashes or artifacts, your OC is solid.
- Benchmark and game! – Compare benchmark scores to your baseline and enjoy the performance boost in games! Monitor temperatures closely.
The process is repetitive but straightforward. Real-world testing reveals max stable clocks better than any quick benchmark. Push the memory OC until you see visual artifacts or crashes, then dial back slightly.
With adequate cooling, you can often achieve between +800mhz and +1200mhz offset for a 20-30% memory overclock on the RTX 4090. This will really maximize performance.
Memory Overclocking Results
The actual results you achieve will vary based on the GPU silicon lottery and cooling. Here are some examples:
- Stock RTX 4090 = 21 Gbps memory speed
- +600mhz offset = +3 Gbps = 24 Gbps
- +1000mhz offset = +5 Gbps = 26 Gbps
That 1000mhz overclock equates to around 15% higher memory bandwidth for much smoother gaming. Of course you need to verify total system stability in this range.
Memory OC scales well with core clock too. You can combine both for additional performance according to your chip’s capabilities. Just make small increments to each.
Optimizing Overclocked RTX 4090 Settings
Once you’ve dialed in the maximum memory OC, a few other settings tweaks can help optimize performance:
- Increase power limit – A higher power limit prevents throttling and sustains boost clocks. Try 115-120% if temperatures allow.
- Adjust fan curve – More aggressive fan speeds reduce peak temps for steadier clocks under load. Prioritize lower noise if preferred.
- Add core clock offset – Add around +100mhz core clock once memory is maxed for extra FPS. Too much risks a crash.
- Try undervolting – Lower voltage can stabilize higher clocks or reduce heat. Useful if temperature limited.
After tweaking these settings, re-run benchmarks to confirm improved scores over your baseline. The RTX 4090 will easily push 100+ fps at 4K resolution in many titles.
See Also: How Long Does A Lenovo Laptop Last?
Detailed Overclocking Process
Let’s go through the overclocking process in more detail for optimal results:
1. Benchmark Baselines
- Run benchmarks like 3DMark Time Spy and Fire Strike at stock settings
- Play games like Shadow of the Tomb Raider, noting average FPS
- Record scores before overclocking to compare performance
2. Peak Temperature Evaluation
- Monitor the peak temperature reached on the GPU under gaming/benchmark loads
- Aim to stay under 80C peak for safe overclocking room
- If already reaching 80C+, improve case airflow first
3. Increase Power Limit
- Set power limit to maximum (e.g. 115%)
- This prevents any throttling from the card pulling more wattage
- Monitor total board power draw in software
4. Fan Profile Setup
- Create a more aggressive fan curve in OC software
- Maintain reasonable noise levels but provide extra cooling capacity
- Set fan to ramp up faster and reach higher speeds under load
5. Find Maximum Core Clock
- Start with +50mhz core clock offset
- Increase by +15mhz increments, testing stability each time
- Stop if crashes, artifacts, temps get too high
- Then dial back -15mhz for safety margin
6. Memory Clock Overclocking
- With max core clock set, now focus on memory OC
- Start with +100mhz memory offset
- Keep adding +100mhz until instability occurs
- Then back down in -50mhz increments until stable
7. Power Limit Fine Tuning
- With OC dialed in, can try lowering power limit slightly
- This reduces heat while maintaining clock speeds
- If crashes occur, increase power limit again
- Find the sweet spot for your card
8. Final Stability Testing
- Run extended stress testing for at least an hour
- Watch for artifacts, crashes, overheating
- If it passes, the OC is rock solid for daily gaming
- Enjoy the extra frames and smoother experience!
Adding Voltage for Advanced Overclocking
The steps above cover air-cooled memory overclocking of the RTX 4090 Founders Edition. More advanced users can take things further by adding voltage for potentially higher clocks.
Caution: Increasing voltage significantly increases power draw and heat generation. This takes more robust cooling and excellent case airflow. Watch thermals closely and stop at the first sign of instability or overheating.
If you want to push the limits with added voltage, follow these general guidelines:
- Increase voltage slider slowly in +5mV increments
- Test thoroughly for stability at each step
- Look for clock speed improvements from the extra voltage
- Don’t exceed 1.1V total board power
- Monitor temperatures and power draw
- Reduce voltage if temps rise over 85C
- Consider water cooling for best voltage OC results
With good silicon luck and cooling, you may reach as high as 1600Mhz+ on the memory with added voltage. This can provide another 5-10% performance versus out of the box.
However, take extreme care when adding voltage to avoid damaging the expensive GPU or other components. Only experienced overclockers should attempt advanced voltage tuning.
Conclusion
The RTX 4090 is already an absolute beast in terms of graphics horsepower. But overclocking allows enthusiasts to extract even more performance for ultra smooth high-resolution gameplay. Concentrate first on the memory OC for big bandwidth improvements. Then optimize with core clock offsets, power limits and fan curves.
With some patience finding the limits of your particular GPU, you can achieve noticeable FPS gains in your favorite titles. Just be safe, take things slow, and monitor thermals diligently. Enjoy pushing the RTX 4090 to its limits!
